Learn how to create a tri-fold brochure that folds correctly. Included are free templates for Adobe InDesign and Illustrator.
How to export a PDF in Microsoft Publisher
Directions for exporting a 'Commercial Press' quality PDF from Microsoft Publisher.
To export a PDF from Microsoft Publisher 2010-2016, follow these steps below.
Step 1: Click File, hover over Export, and navigate to Create a PDF/XPS Document.
Step 2: In the pop-up window, choose a name for your file and a save location. Click Options, choose the Commercial Press dropdown option, and hit Okay. Click Publish and you're done.
Design Tips: Posters
Posters are usually seen at a distance for only a moment. Viewers need to be drawn to your design out of a myriad of others, and glean vital information quickly. Here are some tips for successful production:
1. Design for output
Knowing how your design will be used, the type of substrate desired, the finished size, where posters may be placed, or if handbills will be made from the same design, are all incredibly helpful in creating an effective completed project.
The most common printed poster size is tabloid (11x17"). If color is to extend to the edge, then the size you create in InDesign or Illustrator should factor for bleed, either by adding a bleed in your document settings (0.125" on all sides), or by creating your document at output size. Full-bleed tabloid size is 11.25x17.25".
A common poster substrate at Bug Press is 100lb Gloss Book. It is a coated paper with a good thickness that handles ink very well. For even thicker posters, we recommend using our 14pt C2S board.
2. Consider visual hierarchy
Visual hierarchy is the arrangement of elements in an order to suggest importance. Objects with the greatest contrast to their surroundings are almost always seen first. There are many ways to create hierarchy in your design, most commonly by adjusting the relative size of objects, color use, and typographic hierarchy.
- Relative size: Enlarging an object is one of the easiest ways to give it visual importance. Conversely, reducing size can de-emphasize and lower visibility. Balance is key, making elements too small can render them unreadable, and too large can be overwhelming. In addition, if too many objects are relatively the same size they compete for attention, rendering the design ineffective.
- Color: A cohesive, consistent color palette should always be a priority. Splashes of color can be useful in drawing attention to important information. Using high-impact colors like yellow or red, or contrasting colors like blue and orange, can grab attention and prioritize information. Value, saturation, and temperature are also important things to consider with your design.
- Typography hierarchy: Title, subtitle, and body copy should all be organized by size. The title should be the largest and most commanding of all type in your design. The subtitle should be smaller, but still relate to the title. The body copy should be even smaller, but not so small that it becomes illegible.
3. Legibility from a distance
The what, when, where of your design should be immediately clear and easy to read. Printing out a proof at full-size and viewing it at the distance you expect your audience to read it is a great way to check legibility.
4. Directing the eye
We are 'conditioned' to start at the top left of a page, scroll to the right, and then return to the left, following this pattern down the page. Designing your poster to be read in a similar manner as someone would a book can assist in controlling the impact on your viewers.
5. Consider typography
Knowing when and how to use big bold flourishes, modern sans-serifs, chunky monotypes, or delicate scripts, can make or break your design. Using the appropriate styles of type for a project are vitally important, and choosing type that is legible for the location and time of your event, or where to get tickets, can increase sales and traffic. Limiting yourself to a select two or three fonts is also generally recommended.
6. Try using one large visual
Large, dominant images are great for posters. Single item illustrations, close up cropped photos, and oversized display typefaces are all effective ways to create a focal point and command attention.
7. Wait a day
Even though deadlines can be tight, try letting your design sit for at least a day before sending it off to the client or printer. This can be helpful in improving the overall design or for noticing errors or typos.
8. Check your facts
The most important elements of a poster, the what, when, and where must be correct. Confusing something like the dates of an event means that anything sent to your printer is wrong. This adds cost to your project, can delay completion, and can look really bad to a client.
So check the calendar, check the event times, check the address of the venue. And if there's a conflict, notify the client before proceeding.
Examples of excellent poster design:
How to export a PDF in Adobe Illustrator
Step by step directions for exporting a 'Press Quality' PDF from Illustrator.
You can either download and use our custom BUG PRESS job option, or follow the steps below to include the preferred settings yourself.
In Illustrator using Bug Press job option
To install Bug Press job option:
Download Bug Press job option.
Go to Edit > Adobe PDF Presets...
Click 'Load'
Navigate to 'BUG PRESS_noconvert' and click 'Open'
Then click 'Done'
To use Bug Press job option:
Go to File > Save As...
In new window:
Save as:_____(Name your file and note the location you are exporting it to)
For Mac 'Format': Adobe PDF (Print)
For Windows 'Type': Adobe PDF (Print)In next window, choose Adobe PDF Preset: 'BUG_PRESS_noconvert"
Then click 'Export'
Examine your PDF in Adobe Acrobat. It should now be ready for upload.
Export PDF without using a job option:
Go to File > Save As...
In new window:
Save as:_____(Name your file and note the location you are exporting it to)
For Mac 'Format': Adobe PDF (Print)
For Windows 'Type': Adobe PDF (Print)In next window, choose Adobe PDF Preset: Press Quality
~ Under General > Options: check 'View PDF after Exporting'
~ Under Compression > Color Images: Bicubic 400, Grayscale Images: Bicubic 400, Monochrome Images: Bicubic 1200
~ Under Marks and Bleeds > Bleed and slug: Check 'Use Document Bleed Settings' (If you set up a bleed, the boxes should display .125 inches for each edge)Then click 'Export'
Examine your PDF in Adobe Acrobat.
How to export a PDF in Adobe Photoshop
Step by step directions for exporting a 'Press Quality' PDF from Photoshop.
* Photoshop is not recommended for PDF preparation if InDesign or Illustrator are available.
You can either download and use our custom BUG PRESS job option, or follow the steps to include the preferred settings yourself.
In Photoshop using BUG PRESS job option
To install Bug Press job option:
Download Bug Press job option.
Go to Edit > Adobe PDF Presets...
Click 'Load'
Navigate to 'BUG PRESS_noconvert' and click 'Open'
Then click 'Done'
To use Bug Press job option:
Go to File > Save As...
In new window:
Save as: ______ (Name your file and note the location you are exporting it to)
For Mac ‘Format’: Photoshop PDF
For Windows ‘Type’: Photoshop PDF
In next window, choose Adobe PDF Preset: [BUG PRESS_noconvert]
Then click ‘Export’
Examine your PDF in Adobe Acrobat. It should now be ready for upload
Export PDF without using a job option:
Go to File > Save As...
In new window:
Save as: ______ (Name your file and note the location you are exporting it to)
For Mac ‘Format’: Photoshop PDF
For Windows ‘Type’: Photoshop PDFIn next window choose Adobe PDF Preset: [Press Quality]
Under Compression: Bicubic Downsampling to: 400 Compression: NoneThen click ‘Save PDF'
Examine your PDF in Adobe Acrobat
How to Use Adobe Job Option Files
Download, open, and use Adobe Job Option Files.
What is a Job Option?
A JOBOPTION file is an Adobe PDF preset file. It defines the properties of a PDF that's to be generated using programs like InDesign, Illustrator, and Photoshop. An example of settings defined by JOBOPTION files are image resolution, colorspace, fonts, and printers marks and bleeds.
Here at Bug Press we've created a custom Job Option that has our preferred PDF settings built in for your personal use. It saves time and ensures that your PDF is correctly formatted.
To install Bug Press job option in InDesign:
- Go to File > Adobe PDF Presets > Define...
- Click ‘Load...’
- Navigate to ‘BUG PRESS_noconvert’; Click ‘Open’.
- Then click ‘Done'
To install Bug Press job option in Illustrator and Photoshop:
- Go to Edit > Adobe PDF Presets...
- Click 'Load'
- Navigate to 'BUG PRESS_noconvert' and click 'Open'
- Then click 'Done'
How to use Bug Press job option:
- In InDesign, go to File > Export...
- In new window:
Save as: ______ (Name your file and note the location you are exporting it to)
*For Mac ‘Format’: Adobe PDF (Print)
*For Windows ‘Type’: Adobe PDF (Print)
Then click ‘Save’ - In next window, choose Adobe PDF Preset: [BUG PRESS_noconvert]
- Then click ‘Export’
- Examine your PDF in Adobe Acrobat. It should now be ready for upload
How to export a PDF in Pages for Mac
Directions for exporting a 'Print' quality PDF from Pages for Mac.
Although Pages is not recommended for professional quality file creation, sometimes it's the only option available. To export a PDF from Pages, follow these steps below.
Step 1: Click File > Export to > PDF...
Step 2: In the 'Export Your Document' window, navigate to Image Quality and select 'Best'.
Step 3: Choose a name and save location for your file and then click Export.
How to export a PDF in Microsoft Word
Directions for exporting a 'Print' quality PDF from Microsoft Word.
Although Microsoft Word is not recommended for professional quality file creation, sometimes it's the only option available. To export a PDF from Microsoft Word 2013-2016, follow these steps below.
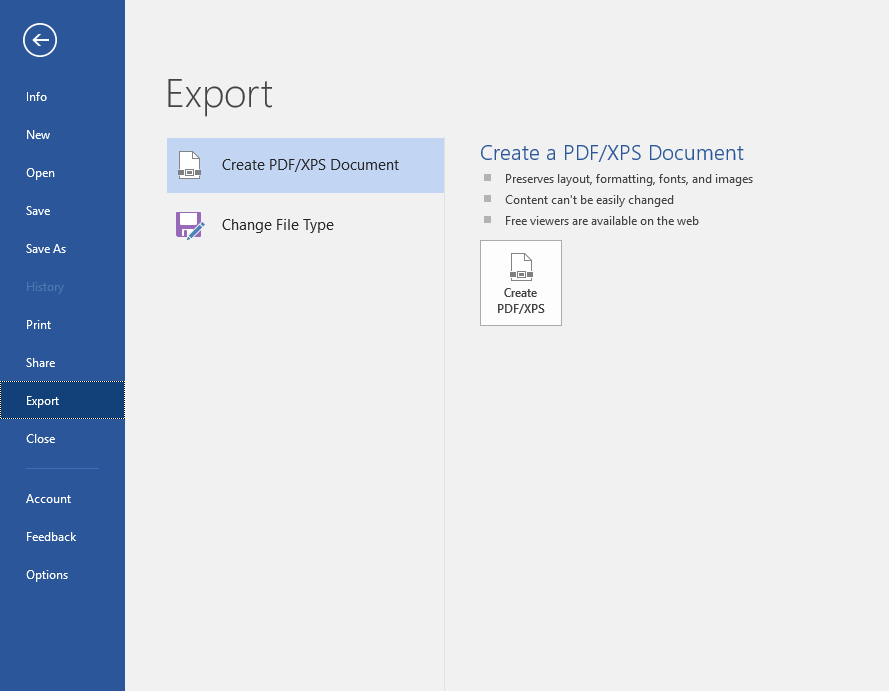
Step 1: Click File, then hover over Export and navigate to Create a PDF/XPS Document.
Step 2: In the pop-up window, choose a name for your file and a save location. Be sure that your PDF output is for printing by navigating to Optimize and selecting Standard (publishing online and printing). Click Publish and you're done.